Summer memories come alive with the first bite of this no-bake banana split cake. Our family gatherings were all about desserts that cooled us down without heating up the kitchen. This dessert brings back those moments with its cool, creamy taste and nostalgic flavors.
Imagine making a dessert that mixes the banana split’s magic into a simple no-bake cake. It’s perfect for summer parties, turning ice cream flavors into a hit that’s easy to make and fun to eat.
Key Takeaways
- Zero baking required for this delightful summer dessert
- Serves 12-15 guests with minimal preparation time
- Refrigerates easily for 3-4 days
- Gluten-free and vegan options available
- Uses classic banana split flavors in a convenient cake format
What Makes No-Bake Banana Split Cake Special
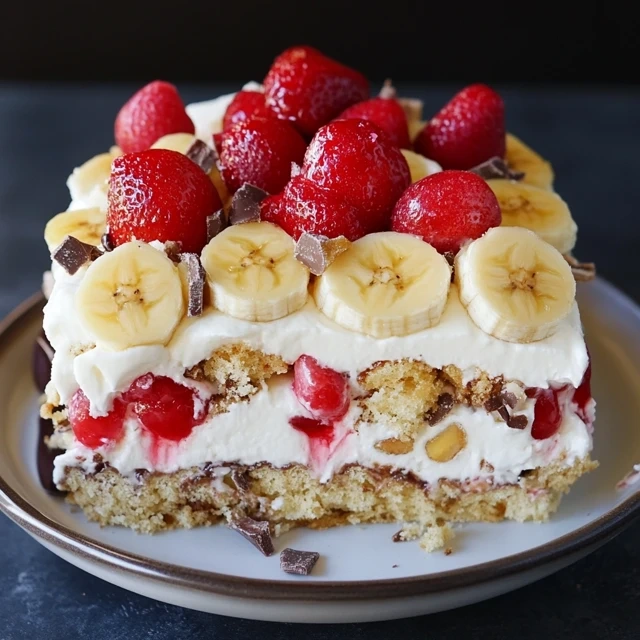
A luscious no-bake banana split dessert sits atop a graham cracker crust, surrounded by a vibrant array of fresh fruit and drizzled with a rich chocolate sauce. The banana slices are arranged in a visually striking pattern, complemented by juicy strawberry halves and plump blueberries. The dessert’s creamy, indulgent texture is highlighted by the crisp graham cracker base, creating a delightful contrast. Soft lighting from above casts a warm, inviting glow, accentuating the dessert’s vibrant colors and glossy finish. The overall scene evokes a sense of effortless elegance and the irresistible appeal of a classic banana split, perfectly capturing the essence of the “No-Bake Banana Split Cake” recipe.
Discover the ultimate summer frozen dessert. It combines the flavors of a classic banana split with the ease of an icebox cake. This no-bake banana dessert recipe turns a traditional ice cream treat into a hit for warm weather parties.
This dessert is special because of its simplicity and flexibility. Unlike baked cakes, it has big advantages:
- Zero oven time required
- Minimal preparation effort
- Refreshing summer flavor profile
- Easy to customize and adapt
Classic Banana Split Flavors
Your taste buds will go back to childhood with this dessert. Each layer captures the essence of the classic sundae – from creamy pudding to fresh fruit. It’s a nostalgic culinary experience that’s both familiar and exciting.
Perfect for Summer Entertaining
Hosting a summer party is easy with this make-ahead dessert. It takes just 25 minutes to prepare and 5 hours to chill. You can serve 12 people without any stress.
Time-Saving No-Bake Solution
Busy home cooks will love this banana dessert recipe. It saves time and energy by skipping baking. Yet, it still looks and tastes like it took hours to make.
Essential Ingredients and Equipment

A neatly arranged tableau of essential ingredients and equipment for creating layered desserts. In the foreground, a selection of ripe bananas, fresh berries, and creamy whipped cream. In the middle ground, assorted baking pans, spatulas, and mixing bowls. In the background, jars of chocolate sauce, caramel, and sprinkles. Soft, warm lighting casts a cozy, inviting glow, highlighting the vibrant colors and textures of the scene. The composition is balanced and visually appealing, conveying a sense of culinary artistry and the promise of a delicious, indulgent treat.
Making a no-bake banana split cake is all about the right ingredients and tools. These desserts need precision and the right parts for a great taste.
Your graham cracker crust is the base, needing just a few things. You’ll need:
- 1 ½ cups graham cracker crumbs
- ½ cup unsalted butter, melted
- ¼ cup granulated sugar
For the creamy filling and fruit layers, you’ll need these key ingredients:
- 16 ounces cream cheese (two 8-ounce packages)
- ¼ cup granulated sugar
- 3 ripe bananas
- 8-ounce can crushed pineapple, drained
- 16 ounces fresh strawberries
Here’s what you’ll need to prepare your no-bake dessert:
- 13×9-inch baking dish
- Electric mixer
- Mixing bowls
- Measuring cups and spoons
- Knife for slicing fruits
Pro tip: A food processor makes the graham cracker crust perfect. It ensures a smooth and solid base for your dessert.
Creating the Perfect Graham Cracker Crust
The foundation of any great no-bake banana split cake starts with an exceptional graham cracker crust. This crucial base sets the stage for the delightful layers that will follow in your dessert masterpiece.
Achieving the Ideal Crumb Consistency
Creating a stellar graham cracker crust requires attention to detail. Start with 2 cups of graham cracker crumbs (about 10-12 full crackers). The key is to crush the crackers into fine, even crumbs.
Use a food processor for the most consistent results, or place crackers in a sealed plastic bag and crush them with a rolling pin.
- Use fresh graham crackers for the best texture
- Aim for uniform, fine crumbs without large chunks
- Measure crumbs carefully for the perfect no-bake banana split cake base
Pressing and Setting Techniques
Combine your graham cracker crumbs with ¼ cup of granulated sugar and ½ cup of melted unsalted butter. Mix thoroughly until the crumbs are completely moistened. The mixture should hold together when pressed but not be too wet.
When pressing the crust into your pan, use the back of a measuring cup or your fingers to create an even layer. Press firmly but gently to ensure a compact, stable base for your no-bake banana split cake. Refrigerate the crust for at least 15-20 minutes to set before adding subsequent layers.
| Ingredient | Amount |
|---|---|
| Graham Cracker Crumbs | 2 cups |
| Granulated Sugar | ¼ cup |
| Unsalted Butter (melted) | ½ cup |
Pro tip: For an extra-crisp crust, you can briefly toast the graham cracker crumbs in the oven at 350°F for 5 minutes before mixing with butter and sugar. This simple step enhances the nutty flavor and adds a delightful crunch to your graham cracker crust.
Cream Cheese Filling Preparation

Making the perfect cream cheese frosting is crucial for your easy no-bake cakes. For this banana split cake, you’ll need three packages of cream cheese (8 ounces each). This will give you a rich, creamy filling that will amaze your taste buds.
First, make sure your cream cheese is at room temperature. This makes it blend smoothly. Use an electric mixer to beat the cream cheese until it’s soft and lump-free. A smooth consistency is key to a perfect cream cheese frosting.
- 3 packages (8 oz each) of cream cheese
- 1 can (14 oz) sweetened condensed milk
- 1 tablespoon fresh lemon juice
- 8 ounces Cool Whip, thawed
- 1 cup powdered sugar
Slowly add the powdered sugar to your cream cheese mixture. Mix at low speed to avoid lumps. The key techniques for an incredible cream cheese frosting include:
- Beating cream cheese until completely smooth
- Adding sweetened condensed milk for extra richness
- Incorporating a touch of lemon juice for brightness
- Folding in Cool Whip for a light, airy texture
Your cream cheese filling should be light, fluffy, and just right in sweetness. This no-bake method makes a delightful dessert with little effort. It’s perfect for summer gatherings or when you need a quick dessert fix.
Fresh Fruit Layer Assembly
Creating the perfect fruit layer is key in banana dessert recipes. Your layered desserts will shine with fresh fruits. These fruits add vibrant flavors and textures to your no-bake banana split cake.
Banana Slicing Tips
When preparing bananas for your layered desserts, follow these essential guidelines:
- Select ripe but firm bananas without brown spots
- Use a sharp knife for clean, even slices
- Cut bananas approximately ¼ inch thick
- Slice just before assembly to prevent browning
Pineapple Drainage Methods
Proper pineapple preparation prevents excess moisture in your banana dessert recipes:
- Open the 15-ounce can of crushed pineapple
- Use a fine-mesh strainer to remove liquid
- Press gently with a spoon to extract additional moisture
- Pat pineapple dry with paper towels
Strawberry Arrangement
Arrange strawberries strategically to enhance visual appeal:
| Preparation Step | Technique |
|---|---|
| Washing | Rinse gently, pat dry |
| Slicing | Cut into uniform ½-inch pieces |
| Placement | Create even coverage across cake layer |
Your carefully assembled fruit layer will transform a simple dessert into a stunning culinary masterpiece.
Whipped Topping Techniques
Creating the perfect whipped cream for your no-bake banana split cake makes it truly special. You can choose between homemade whipped cream or store-bought whipped topping.
To make fresh whipped cream, you need just two things:
- 1 cup heavy whipping cream
- 1/2 cup powdered sugar
Chill your mixing bowl and whisk before starting. Cold equipment helps create a more stable whipped cream. Start whipping at medium speed, then go to high. Stop when stiff peaks form, usually in 3-4 minutes.
If you’re in a hurry, store-bought whipped topping is a great choice. It’s easy to use and doesn’t need any prep. Spread it evenly over your banana split cake for a smooth top.
Here are some tips for perfect whipped cream:
- Use heavy whipping cream with at least 36% fat content
- Add vanilla extract for extra flavor
- Avoid over-whipping, which can make cream grainy
- Refrigerate whipped cream immediately after preparing
Your whipped cream will turn the banana split cake into a stunning summer treat. It’s sure to impress everyone.
Adding Classic Banana Split Toppings

Your no-bake banana split cake becomes amazing with the right toppings. The perfect touches turn it from a tasty treat to a stunning dessert. It captures the essence of the classic banana split.
Selecting and Placing Nuts
Choosing the right nuts adds texture and depth to your cake. Here are some great options:
- Chopped pecans for a buttery crunch
- Sliced almonds for delicate texture
- Roasted peanuts for intense flavor
Sprinkle your chosen nuts evenly across the top of the cake. Make sure each slice has a nutty bite. Use about 1/3 cup of chopped pecans for the whole dessert.
Chocolate Drizzle and Cherry Finishing
The final touches are chocolate syrup and maraschino cherries. Drizzle chocolate syrup in zigzag patterns. Then, place 12 bright red maraschino cherries on top – one for each serving.
Pro tip: Pat your cherries dry before placing them. This prevents excess liquid from ruining your cake. These touches make your dessert a stunning summer treat that will wow everyone.
Storage and Make-Ahead Tips
Making tasty frozen desserts like this no-bake cake needs smart storage tips. You can make your banana split cake ahead of time. Keep it fresh with the right refrigeration methods.
Here are the main storage tips for your no-bake cake:
- Refrigerate the cake right after you make it
- Cover it well with plastic wrap or aluminum foil
- Keep it in the coldest part of your fridge
Pro tip: The cake stays best in flavor and texture for up to 4 days in the fridge. Freezing is a great option for longer storage.
Freezing your no-bake cake needs careful wrapping:
- Wrap the whole cake in plastic wrap
- Add another layer of aluminum foil
- Mark it with the date you made it
- Freeze for up to 2 weeks
When you’re ready to eat it, thaw the frozen cake in the fridge for a few hours. Take off toppings like cherries or whipped cream before freezing. Add them just before serving for the best look and taste.
Homemade whipped cream might get watery after freezing. It’s better to use stabilized whipped topping or fresh cream just before serving your no-bake banana split cake.
Troubleshooting Common Issues
Making the perfect no-bake banana split cake can be tricky. This guide will help you avoid common problems. So, your banana desserts will always be a hit.
When you’re making your no-bake banana split cake, you might face some issues. Knowing these problems will help you make a dessert that wows your guests.
Preventing Banana Browning
Bananas can turn brown quickly, ruining your dessert’s look. Here’s how to stop it:
- Toss banana slices in pineapple juice right after cutting
- Choose fresh, slightly underripe bananas
- Make the banana layer just before putting the cake together
Texture Problems and Solutions
Getting the right texture is key for a great no-bake banana split cake. Here are some tips for texture issues:
- For a soggy crust, make sure graham crackers are finely ground and packed well
- Chill the crust for at least 15 minutes before adding more layers
- Drain canned fruits well to avoid too much moisture
Experts say to chill your no-bake banana split cake for at least 4 hours before serving. This lets the flavors mix and the cake set right. With these tips, you’ll make a dessert that looks and tastes amazing.
Variations and Substitutions
Creating unique banana dessert recipes lets you make the classic banana split cake your own. You can change it to fit different tastes, dietary needs, and seasons.
Fruit Variations
- Try seasonal alternatives instead of traditional fruits:
- Blueberries
- Raspberries
- Peaches
Dietary Adaptations
- Make it Gluten-Free:
- Use gluten-free graham crackers
- Check all ingredient labels
- Go Dairy-Free:
- Swap dairy cream cheese for plant-based options
- Use coconut whipped topping
Alternative Crusts
| Crust Type | Flavor Profile |
|---|---|
| Vanilla Wafer Crumbs | Light, sweet base |
| Chocolate Cookie Crumbs | Rich, decadent foundation |
| Ground Nuts | Nutty, textured bottom layer |
Try using honey, agave syrup, or maple syrup instead of refined sugar. For a nut-free version, skip nuts and add extra chocolate syrup or colorful sprinkles.
Your banana split cake can be a canvas for creativity. It can turn a classic dessert into a unique treat that fits your taste and health needs.
Nutritional Information and Serving Size
Your favorite summer dessert is not only tasty but also good for you. The no-bake banana split cake is a perfect treat. It has the right amount of nutrients for a satisfying dessert.
Knowing the nutritional facts lets you enjoy this dessert without guilt. Each slice is packed with energy and important nutrients. It’s more than just a sweet treat.
| Nutritional Aspect | Amount per Serving |
|---|---|
| Calories | 395 kcal |
| Total Carbohydrates | 43 g |
| Protein | 5 g |
| Total Fat | 24 g |
| Sugar | 26 g |
For those watching their intake, consider these nutrient highlights:
- Moderate protein content supports muscle health
- Contains essential vitamins like Vitamin A and C
- Provides calcium and iron
When serving your no-bake banana split cake, aim for 2-3 inch square pieces. A 13×9 inch dish typically yields 12-15 servings, perfect for gatherings or family dessert nights.
Pro tip: Store leftover cake in an airtight container in the refrigerator for up to 4 days, ensuring maximum freshness and flavor.
Conclusion
Making this summer dessert is more than just a recipe. It’s an experience that brings joy to your kitchen. These easy no-bake cakes are perfect for impressing guests without the hassle of cooking.
Your no-bake banana split cake combines classic flavors with simple preparation. It’s a crowd-pleaser for any gathering. It’s a great choice for home cooks looking to impress.
Summer desserts like this banana split cake are all about creativity and personalization. You can easily adapt the recipe to suit your taste preferences or dietary needs. Whether it’s for a family barbecue, potluck, or a cool treat at home, this dessert promises to be memorable.
Don’t be afraid to experiment with different toppings, fruit combinations, or crust variations. The beauty of this no-bake cake lies in its versatility. Invite your friends and family to join in the fun, share your own twists on the recipe, and create delicious memories.
Your journey with this no-bake banana split cake is just beginning. Embrace the simplicity, enjoy the process, and savor every delightful moment of creating and sharing this sweet summer sensation.
FAQ
How long does a no-bake banana split cake last in the refrigerator?
Your no-bake banana split cake will last 3-4 days in the fridge if stored right. For the best taste, eat it within 2-3 days. This way, the fruit stays fresh and flavorful.
Can I make this dessert ahead of time?
Yes, you can make it up to 2 days early. It’s best to make it a few hours before serving. This lets the flavors mix well. Just add whipped cream and cherries right before serving.
Is there a way to prevent bananas from browning in the cake?
To stop bananas from turning brown, try a few things. Dip them in lemon or pineapple juice before adding. Or, brush them with a mix of citrus and honey. You can also use less ripe bananas or add the banana layer just before serving.
Can I make this dessert dairy-free or gluten-free?
Yes! For a dairy-free version, use plant-based cream cheese and whipped topping. For gluten-free, use gluten-free cookie crumbs or almond flour. Many stores have these alternatives to fit your diet.
How many servings does a typical no-bake banana split cake make?
A standard cake serves 8-10 people, depending on slice size. For big gatherings, make two cakes or cut smaller slices. This way, everyone gets a taste.
Can I freeze this dessert?
You can freeze it for up to 2 weeks. Wrap it in plastic wrap and foil to avoid freezer burn. Thaw in the fridge overnight. Note that fresh fruits might change texture after freezing, so add fresh toppings after thawing.
What are some creative variations I can try?
Try new things like adding mango or raspberries. Use a chocolate crust or add caramel drizzle. You can also try different nuts or a chocolate ganache layer for extra indulgence.
Is this dessert kid-friendly?
Definitely! Kids love it for its sweet taste and colorful look. It’s also fun to make with kids because it doesn’t need a hot oven.
Free Body Calculator – Know Your Body
Wondering if your body is in a healthy range? Use our Free Body Calculator to find out if you’re fit, normal, or need a lifestyle change. Get personalized tips, calorie targets, and your ideal protein, carbs, and fat intake – all in seconds.
Try Free Body Calculator Now
Easy Layered No-Bake Banana Split Cake with Graham Crust
Ingredients
- For the Crust:
- 2 cups graham cracker crumbs
- ½ cup unsalted butter melted
- ¼ cup granulated sugar
- For the Creamy Layer:
- 1 8-ounce block cream cheese, softened
- ½ cup unsalted butter softened
- 2 cups powdered sugar
- 1 teaspoon vanilla extract
- For the Fruit Layers:
- 3-4 medium bananas sliced
- 1 20-ounce can crushed pineapple, drained well
- 1 cup fresh strawberries diced
- For the Topping:
- 2 cups whipped topping Cool Whip or homemade whipped cream
- ½ cup chopped pecans or walnuts optional
- ¼ cup chocolate syrup for drizzling
- 12-16 maraschino cherries

Instructions
- Prepare the Crust:
- In a bowl, mix graham cracker crumbs, melted butter, and sugar.
- Press the mixture into a 9×13-inch dish, ensuring an even layer.
- Chill in the fridge while preparing the filling.
- Make the Creamy Layer:
- In a large mixing bowl, beat cream cheese and butter until smooth.
- Add powdered sugar and vanilla extract, mixing until light and fluffy.
- Spread the cream cheese mixture evenly over the crust.
- Add the Fruit Layers:
- Arrange sliced bananas evenly over the cream cheese layer.
- Spread the drained crushed pineapple over the bananas.
- Evenly distribute the diced strawberries on top.
- Top with Whipped Cream:
- Gently spread whipped topping over the fruit layers.
- Garnish And Chill:
- Sprinkle chopped nuts (if using) over the whipped cream.
- Drizzle with chocolate syrup.
- Add maraschino cherries on top for the classic banana split look.
- Cover and refrigerate for at least 4 hours (or overnight) for best results.
- Serve:
- Slice and serve chilled. Enjoy this refreshing and creamy treat!
Notes
- Make-Ahead Friendly: Best made a day ahead to allow flavors to blend.
- Crust Variations: Try an Oreo crust for a chocolatey twist.
- Fruit Swaps: Use fresh pineapple instead of canned, or add blueberries for extra color.
- Storage: Keep refrigerated for up to 3 days.