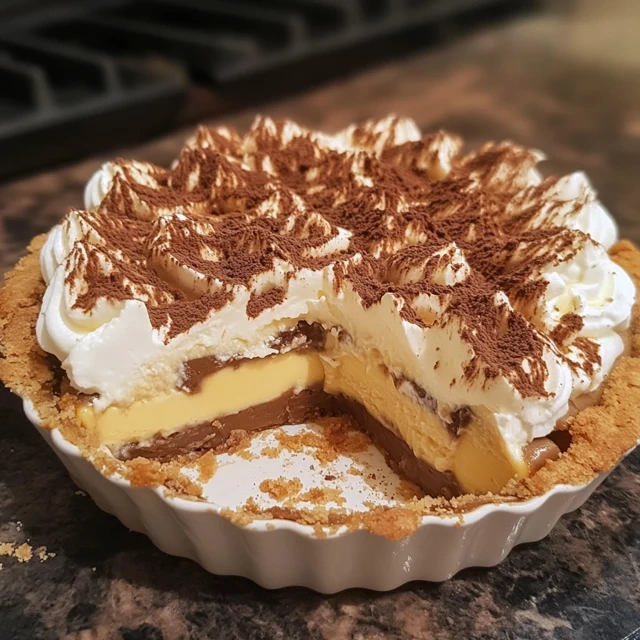
I remember my first taste of banoffee pie from my grandmother. It was like a magical moment. The creamy, caramel taste was unforgettable. Banoffee pie is more than a recipe; it’s a mix of rich flavors and textures.
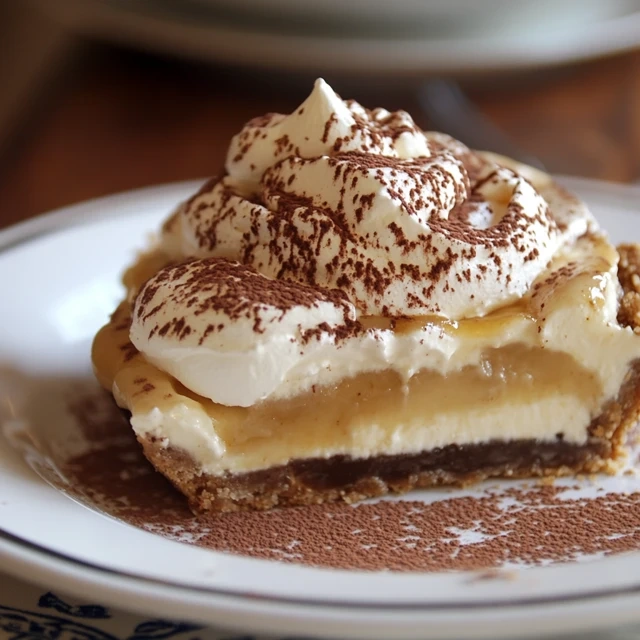
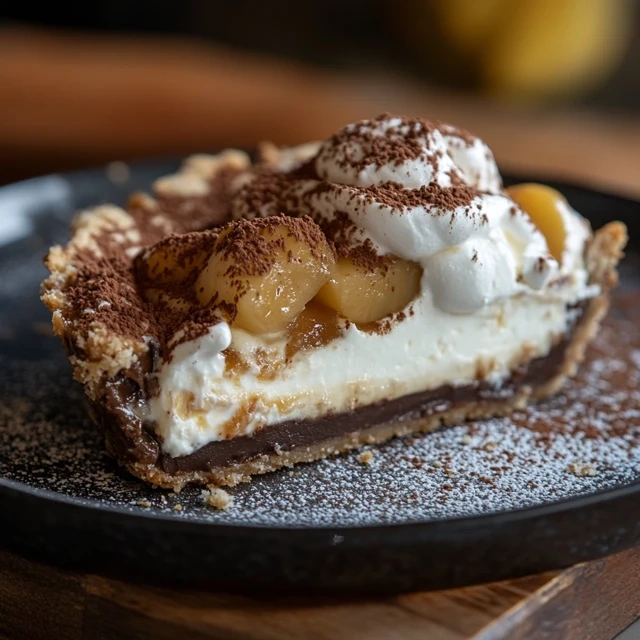
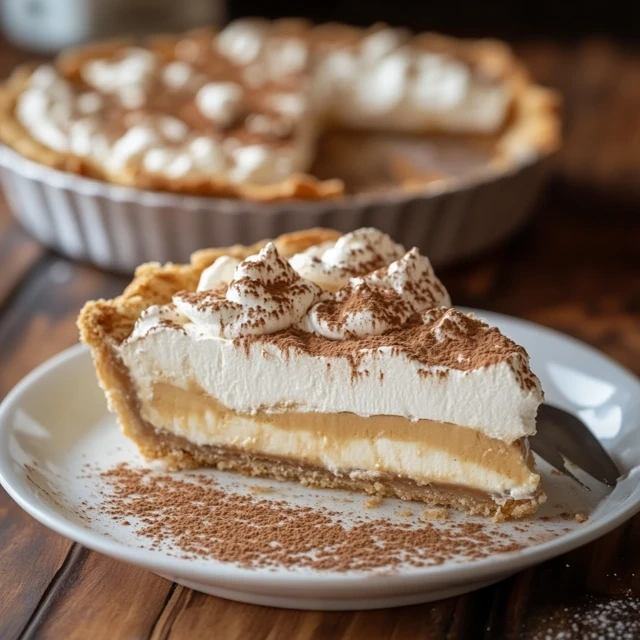
Banoffee pie is a comfort dessert at its best. It has a buttery base, toffee, bananas, and whipped cream. It’s perfect for anyone who loves sweets. This classic recipe will change how you see desserts.
Get ready for a journey through Britain’s favorite dessert. Your taste buds will love this iconic banoffee pie. It’s a treat that has won hearts all over the world.
Key Takeaways
- Discover the rich history behind the classic banoffee pie
- Learn essential ingredients for creating the perfect dessert
- Understand the unique flavor combinations that make this pie special
- Explore both traditional and modern preparation techniques
- Master the art of assembling a stunning banoffee pie
The Rich History of Banoffee Pie in British Cuisine
Explore the story of Banoffee Pie, a favorite dessert in english cuisine. It started as a culinary adventure that changed dessert menus everywhere.
Origins at The Hungry Monk Restaurant
In 1971, the Hungry Monk Restaurant in East Sussex created this amazing dessert. Chefs Nigel Mackenzie and Ian Dowding mixed traditional recipes to make something special.
- Created in a small restaurant in East Sussex
- Result of culinary experimentation
- Named by combining “banana” and “toffee”
A vintage English kitchen, delicate floral teacups and teapot, freshly baked banoffee pie, handwritten recipe card, antique silver utensils, warm late afternoon light
Evolution into a British Classic
The pie quickly became popular in the UK. Its simple yet rich ingredients made it a hit in english cuisine. It moved from local restaurants to home kitchens and bakeries.
Global Influence and Popularity
What started as a local dish became a global hit. Restaurants and home bakers around the world loved Banoffee Pie. They made it their own while keeping its core flavors.
| Decade | Popularity Status |
|---|---|
| 1970s | Local Specialty |
| 1980s | National Favorite |
| 1990s-2000s | International Dessert |
Today, Banoffee Pie is a symbol of British culinary creativity. It’s loved by dessert fans all over the world.
Essential Ingredients for the Perfect Banoffee Pie
Making a delicious banoffee pie begins with picking the best ingredients. Your success depends on choosing the right parts. These will turn simple ingredients into a tasty dessert.
high-resolution photorealistic image of a sleek grey ceramic plate topped with ripe bananas, dulce de leche, whipped cream, chocolate shavings, and crumbled biscuits
- Digestive biscuits for the crisp base
- Unsalted butter for binding
- Condensed milk for rich toffee
- Ripe bananas
- Heavy whipping cream
Choose bananas that are perfectly ripe with a few brown spots. These bananas are the sweetest and softest for your pie. Making the toffee layer takes patience. You need to slowly caramelize the condensed milk to get that deep golden color and intense flavor.
If you have dietary restrictions, here are some alternatives:
- Gluten-free digestive biscuits for the base
- Coconut cream instead of dairy cream
- Vegan condensed milk substitutes
Every ingredient is vital for the perfect mix of sweet toffee and fresh banana flavors. This makes banoffee pie a favorite dessert for many.
Creating the Perfect Buttery Biscuit Base
The base of a Banoffee pie is key to its success. A good pie crust contrasts nicely with the creamy filling. Professional bakers focus on the right ingredients and methods for a great base.
a crusty biscuit base, freshly baked, golden brown, flaky texture, butter and sugar aroma, with a crisp and crumbly exterior
Making a tasty pie crust needs careful attention. The mix of biscuits and butter must be just right. It should be strong yet light, enhancing the filling’s flavor.
Selecting Your Biscuit Base
Picking the right biscuits is essential. While digestive biscuits are common, you can also use:
- Graham crackers for a classic American twist
- Shortbread biscuits for extra richness
- Chocolate cookies for a decadent variation
Crushing Techniques for the Perfect Texture
Getting the right texture for your crust is important. Use a food processor or a rolling pin in a bag to crush biscuits. You want fine crumbs that stick together well.
Binding with Butter
Melted butter is crucial for binding your crust. Use just enough to hold the crumbs together without being too greasy.
| Biscuit Type | Butter Ratio | Recommended Technique |
|---|---|---|
| Digestive Biscuits | 1/2 cup per 250g biscuits | Press firmly into pan |
| Graham Crackers | 1/3 cup per 250g biscuits | Chill before serving |
| Shortbread | 2/3 cup per 250g biscuits | Compact gently |
Pro tip: Chill your pie crust for at least 30 minutes before adding more layers. This makes the base more stable for your Banoffee pie.
Mastering the Caramel Toffee Layer
A caramel toffee layer being prepared: flowing golden caramel sauce dripping over a rich, creamy toffee filling inside a flaky pastry crust.
Making the perfect caramel layer is key to a great Banoffee Pie. Your caramel toffee can make or break the dessert. So, it’s crucial to master this step for pie success.
There are a few ways to make a rich caramel layer. The two most common methods are:
- Boiling condensed milk directly in its can
- Creating caramel from scratch using sugar and cream
When working with caramel, safety is very important. Hot sugar can cause severe burns. So, wear protective kitchen gloves and stay focused during preparation.
| Caramel Preparation Method | Difficulty Level | Estimated Time |
|---|---|---|
| Condensed Milk Boiling | Easy | 45-60 minutes |
| Scratch Caramel Method | Advanced | 30-45 minutes |
For the best caramel texture, aim for a golden-brown consistency. It should be spreadable but not runny. Stir constantly to avoid burning and get a smooth, creamy finish.
Professional bakers suggest using a candy thermometer. It helps you get the perfect color and prevents overcooking.
Selecting and Preparing Bananas for Your Pie
Bananas are the heart of any delicious Banoffee pie. They turn these sweet treats into something truly special. Choosing the right bananas is key to your dessert’s taste and look.
Knowing when bananas are ripe is very important. Not all bananas are the same when it comes to making pie.
Banana Ripeness Guide
- Green bananas: Too firm, lacking sweetness
- Yellow with green tips: Slightly underripe
- Perfect ripeness: Fully yellow with small brown spots
- All brown: Too soft, overly sweet
Innovative Slicing Techniques
Make sure to slice your bananas evenly. This way, every bite will have the same taste and feel. Use a sharp knife and aim for:
- Diagonal cuts for elegant presentation
- Even thickness (approximately 1/4 inch)
- Consistent slice size
Preventing Banana Browning
| Method | Effectiveness | Preparation Time |
|---|---|---|
| Lemon juice | High | 2 minutes |
| Citric acid solution | Very High | 3 minutes |
| Honey wash | Medium | 1 minute |
Keep your banana slices from turning brown with these easy methods. A quick dip in lemon juice or citric acid can make them look fresh for hours.
Whipping the Perfect Cream Topping
Making the perfect cream topping turns your Banoffee Pie into a top-notch dessert. The right whipped cream makes your pie go from good to amazing. It adds a light, airy finish that matches the rich caramel and banana layers.
Choosing the right ingredients is key for the perfect cream topping. Start with:
- Heavy whipping cream (cold)
- Powdered sugar
- Vanilla extract
- Chilled mixing bowl
Professional bakers know that temperature is important for whipping cream. Keep your cream and bowl cold for the best results. Use these pro tips to make a stunning topping:
- Chill your mixing bowl and whisk for 15 minutes before starting
- Pour cold heavy cream into the chilled bowl
- Begin whipping at medium speed
- Gradually add powdered sugar
- Whip until soft peaks form
Timing is crucial when whipping cream. Overwhipping makes it grainy, while underwhipping makes it runny. Aim for soft peaks that hold their shape but aren’t too stiff.
| Cream Whipping Stage | Visual Indicator | Recommended Use |
|---|---|---|
| Soft Peaks | Peaks slightly fall over | Ideal for Banoffee Pie topping |
| Stiff Peaks | Peaks stand straight up | Piping and decorative work |
| Overwhipped | Grainy, butter-like texture | Not recommended |
For a special flavor, add vanilla extract or cocoa powder to your whipped cream. The right presentation makes your Banoffee Pie look as good as it tastes.
No-Bake vs. Baked Banoffee Pie Methods
Banoffee Pie offers two ways to make no-bake desserts. You can choose between no-bake and baked methods. Each method has its own benefits and suits different cooking styles.
Traditional No-Bake Approach
The classic no-bake method is great for beginners. It’s quick and easy, requiring no oven. This way, you get a creamy dessert fast.
- No oven required
- Faster preparation time
- Minimal cooking skills needed
- Cooler ingredients maintain fresh texture
Modern Baked Variations
Baked Banoffee Pie brings a new twist. It offers deeper caramel flavors and a richer taste. This method needs more skill but is worth it for the complex flavors.
| Method | Preparation Time | Skill Level | Flavor Intensity |
|---|---|---|---|
| No-Bake | 30 minutes | Beginner | Light |
| Baked | 60-75 minutes | Intermediate | Rich |
Deciding between no-bake and baked depends on your time, skill, and taste preferences. Both methods can make a delicious Banoffee Pie.
Common Mistakes to Avoid When Making Banoffee Pie
Making the perfect banoffee pie can be tricky, even for experienced bakers. Several common pitfalls can turn your delightful dessert into a culinary disappointment. Understanding these potential challenges will help you craft a spectacular banoffee pie that will impress your guests.
When making a banoffee pie, bakers often encounter several critical mistakes:
- Soggy Biscuit Base: The foundation of your banoffee pie can easily become soggy if not prepared correctly. Ensure your biscuit base is firmly compressed and chilled before adding subsequent layers.
- Runny Caramel Layer: Achieving the right consistency for your toffee or caramel is crucial. Overcooking or undercooking can result in a layer that’s either too hard or too liquid.
- Overripe Bananas: Selecting the right bananas is essential. Bananas that are too ripe will brown quickly and create an unappealing appearance in your banoffee pie.
Temperature control plays a significant role in banoffee pie preparation. Whipped cream can quickly lose its structure if not kept cold. Always whip cream just before serving and refrigerate your pie until the moment you’re ready to enjoy it.
Pro tip: Slice bananas just before assembling your banoffee pie to prevent browning. A light brush of lemon juice can help maintain their fresh appearance and prevent oxidation.
By avoiding these common mistakes, you’ll be well on your way to creating a banoffee pie that’s both visually stunning and deliciously satisfying.
Storage Tips and Shelf Life
Keeping your homemade Banoffee pie fresh is key. Proper storage helps keep its taste and texture perfect. Follow these tips to enjoy your pie for longer.
Refrigeration Techniques
Storing your Banoffee pie right is important. Here’s how to keep it fresh:
- Cover the pie tightly with plastic wrap
- Store in the refrigerator’s main compartment
- Keep away from strong-smelling foods
Freezing Your Banoffee Pie
Freezing is a great way to save your pie for later. Here’s how to do it right:
- Wrap individual slices in plastic wrap
- Place wrapped slices in an airtight container
- Freeze for up to 2 months
Freshness Indicators
It’s important to know when your pie is no longer fresh. This ensures you enjoy it safely and at its best.
| Freshness Indicator | Action |
|---|---|
| Soggy Base | Discard immediately |
| Banana Browning | Consume within 2-3 days |
| Cream Separation | Best eaten within 24 hours |
By storing your Banoffee pie correctly, it will always be ready to impress. Enjoy it with confidence!
Creative Variations and Modern Twists
Turn your classic Banoffee Pie into something amazing with new twists. These creative changes will surprise and please your taste buds. They keep the delicious core of the traditional recipe but add exciting new flavors.
Alternative Bases
Try these unique crusts to upgrade your pie:
- Chocolate cookie crust
- Graham cracker base
- Nutty almond crust
- Gluten-free oat base
Fruit and Flavor Innovations
Try new flavors to make your desserts even better:
| Variation | Key Ingredients |
|---|---|
| Tropical Banoffee | Add pineapple and coconut |
| Chocolate Lover’s | Incorporate dark chocolate ganache |
| Berry Fusion | Mix in strawberries or raspberries |
Dietary-Friendly Options
Make sure everyone can enjoy these treats. Here are some ideas:
- Vegan Banoffee: Use coconut cream and plant-based caramel
- Gluten-Free Version: Swap traditional biscuits with gluten-free alternatives
- Low-Sugar Option: Use natural sweeteners
Whether you love trying new things or need special options, these Banoffee Pie variations will wow you. They make your desserts unique and delicious, impressing everyone with their creativity.
Expert Tips for Professional-Looking Presentation
To turn your Banoffee pie into a masterpiece, focus on the details and use expert techniques. The way your dessert looks can make the whole dining experience better. It will make your pie look so good, people will want to take pictures of it.
Pastry chefs know that how you present a dessert is just as important as how it tastes. Here are some tips to make your Banoffee pie look as good as it tastes:
- Use a sharp, clean knife dipped in hot water for perfect pie slices
- Invest in a piping bag for elegant cream decorations
- Choose white plates to make the pie colors pop
- Garnish with chocolate shavings or caramel drizzle
Improving your dessert’s look can be done with the right plating techniques. Here are some strategies from the pros:
- Chill the pie before slicing to maintain clean edges
- Use a offset spatula for smooth cream application
- Create height by using a decorative cake stand
For the best photos of your dessert, use natural light. Place your Banoffee pie near a window with soft, diffused light. This will highlight its layers and textures beautifully.
| Presentation Technique | Impact |
|---|---|
| Precise Cream Piping | Adds Professional Elegance |
| Chocolate Shaving Garnish | Enhances Visual Appeal |
| Clean Slice Presentation | Showcases Layer Definition |
Remember, a beautifully presented Banoffee pie is not just a dessert—it’s an edible work of art that tells a story of culinary passion and creativity.
Conclusion
Making a banoffee pie is more than just following a recipe. It’s about creating a delightful culinary experience. This connects you to British dessert tradition.
You’ve learned the art of crafting this iconic sweet treat. It continues to captivate dessert lovers worldwide.
Each step of creating a banoffee pie offers an opportunity to express your creativity. Whether you choose a traditional no-bake method or experiment with modern variations, the core elements remain the same. A buttery biscuit base, luscious caramel, ripe bananas, and pillowy whipped cream are key.
Your newfound skills will transform this classic dessert into a showstopping centerpiece. It will be the highlight of any gathering.
As you embark on your banoffee pie adventure, remember that practice makes perfect. Don’t be afraid to experiment with different ingredients or presentation techniques. Your unique touch will turn this beloved dessert into a personal culinary signature.
Start baking, get creative, and most importantly, enjoy every delicious moment of your banoffee pie journey.
Free Body Calculator – Know Your Body
Wondering if your body is in a healthy range? Use our Free Body Calculator to find out if you’re fit, normal, or need a lifestyle change. Get personalized tips, calorie targets, and your ideal protein, carbs, and fat intake – all in seconds.
Try Free Body Calculator Now
How to Make the Best Homemade Banoffee Pie
Ingredients
- For the Crust:
- 2 cups graham cracker crumbs or Digestive biscuits, crushed
- ½ cup unsalted butter melted
- For the Toffee Filling:
- 1 can 14 oz sweetened condensed milk
- ¼ cup unsalted butter
- ¼ cup brown sugar
- For Topping:
- 2 bananas sliced
- 1 ½ cups heavy whipping cream
- 2 tbsp powdered sugar
- 1 tsp vanilla extract
- 1 oz dark chocolate grated (for garnish)

Instructions
- Make the Crust:
- Mix graham cracker crumbs and melted butter until combined.
- Press the mixture firmly into the bottom of a 9-inch pie dish.
- Chill in the fridge for 30 minutes while making the filling.
- Make the Toffee Filling:
- In a saucepan, melt butter and brown sugar over medium heat.
- Add sweetened condensed milk and stir constantly for 5-7 minutes, until thickened and caramelized.
- Pour the toffee over the crust and spread evenly.
- Let it cool for 10 minutes, then refrigerate for 1 hour.
- Assemble the Pie:
- Slice bananas and arrange them over the chilled toffee layer.
- In a bowl, whip heavy cream, powdered sugar, and vanilla extract until stiff peaks form.
- Spread whipped cream over the bananas.
- Garnish with grated dark chocolate.
- Chill And Serve:
- Refrigerate for at least 1 hour before serving.
- Slice and enjoy!
Notes
- Shortcut: Use store-bought dulce de leche instead of making toffee.
- Make Ahead: Pie can be made a day ahead, but add bananas just before serving to prevent browning.
- Gluten-Free: Use gluten-free graham crackers for the crust.
- Extra Flavor: Add a drizzle of melted chocolate or caramel sauce on top!
3 thoughts on “How to Make the Best Homemade Banoffee Pie”
Comments are closed.