Imagine stepping into your kitchen and smelling spices and sizzling chicken. It’s a sign of a tasty Mexican meal that’s healthier and more fun than fried dishes. Baked chicken chimichangas are here to change your dinner game, blending crispy texture with deep, satisfying flavors.
These baked chicken chimichangas are more than just food. They’re a journey into the heart of Mexican cooking, right in your home. They’re filled with tender chicken, creamy beans, and melted cheese. This dish shows that cooking at home can be both healthy and incredibly tasty.
Key Takeaways
- Baked chicken chimichangas offer a healthier alternative to traditional deep-fried versions
- The recipe is versatile and adaptable to different protein and vegetarian options
- Perfect for meal prep and can be frozen for future enjoyment
- Combines protein-rich ingredients with delicious Mexican-inspired flavors
- Easy to prepare with minimal cooking time
Understanding the Art of Baked Chicken Chimichangas
Explore the tasty world of healthy chimichangas. This journey turns a classic Mexican-American dish into a nutritious meal. Oven-baked wraps make it a healthier choice than deep-frying.
Origins of Chimichangas
The chimichanga’s history is rooted in Tex-Mex cuisine. It started in Arizona, when a burrito fell into a deep fryer. Chi-Chi’s restaurant chain, founded in 1975, helped make chimichangas popular in the U.S. before closing in 2004.
Baked vs. Fried Versions
Traditional fried chimichangas have more calories and fat. They can have up to 300 extra calories and 20 grams of fat. But, baking them cuts down on calories and fat significantly.
| Cooking Method | Calories | Fat Content |
|---|---|---|
| Deep-Fried Chimichanga | 450-500 | 25-30g |
| Oven-Baked Wraps | 250-300 | 10-15g |
Health Benefits of Baking
- Reduces overall calorie intake
- Maintains crispy texture without excess oil
- Preserves nutritional value of ingredients
Baking your chimichangas has many health benefits. Using whole wheat tortillas adds fiber and nutrients. Adding veggies like bell peppers or spinach boosts the meal’s nutrition.
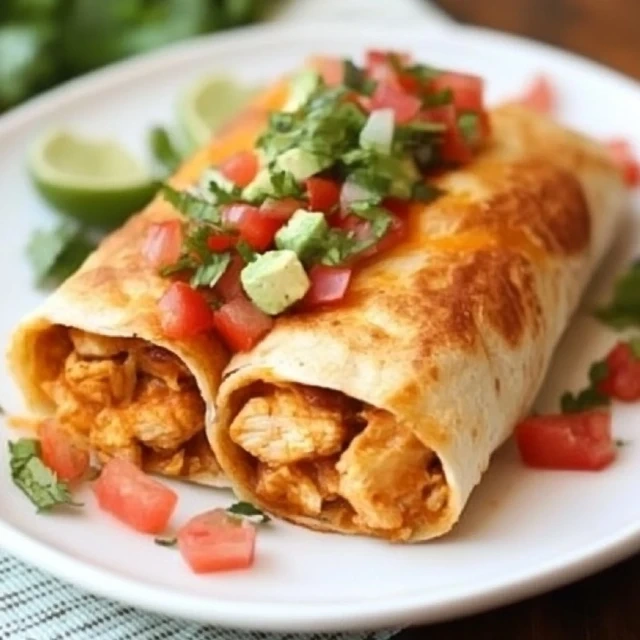
Baked chicken chimichangas with a golden-brown, crispy exterior and a mouthwatering, juicy interior. The chicken is seasoned with a blend of aromatic spices, creating a depth of flavor. Soft, pliable tortillas are carefully wrapped around the chicken filling, then baked to perfection, resulting in a satisfying crunch with every bite. The chimichanga is plated on a rustic wooden surface, accentuated by vibrant green garnishes and a drizzle of creamy, tangy sauce. Warm, natural lighting casts a soft glow, highlighting the dish’s inviting presentation. The overall scene evokes a sense of comfort and homemade goodness, capturing the essence of the baked chicken chimichanga.
Pro tip: Choose low-sodium salsa and use cheese wisely. This way, you get a nutritious meal that’s still full of flavor.
Essential Ingredients for Perfect Chimichangas

Chicken Chimichanga Ingredients: Tender chicken thighs, freshly diced tomatoes, vibrant bell peppers, aromatic onions, and fragrant cilantro sprigs. Warm tortillas, bubbling cheese, and a drizzle of sour cream in the foreground. Hints of spices and herbs in the background, creating a mouthwatering scene. Soft, even lighting illuminates the colorful ingredients, showcasing their textures and inviting the viewer to savor the flavors. Shot from a high angle, capturing the layered, tempting arrangement of the essential chimichanga elements.
Making delicious chimichangas begins with picking the right ingredients. Your flour tortilla rolls are the base. The shredded chicken filling adds flavor and protein to every bite.
The key ingredients for perfect chimichangas include:
- Soft flour tortillas (8-inch recommended)
- Tender shredded chicken filling
- Refried beans
- Green chile sauce
- Monterey Jack cheese
When making your shredded chicken filling, focus on quality and seasoning. Use boneless, skinless chicken breasts. Season with chili powder, cumin, and garlic powder. The chicken should be moist and full of flavor, matching the crispy tortilla rolls.
Here are some tips for choosing ingredients:
- Choose fresh, soft tortillas for easier rolling
- Use high-quality, freshly shredded chicken
- Select a melting cheese like Monterey Jack for optimal texture
- Opt for homemade green chile sauce when possible
Your chimichanga’s success depends on balancing flavors and textures. The right mix of ingredients turns a simple meal into a memorable experience.
Step-by-Step Preparation Guide
Making tasty baked chicken recipes like chimichangas needs careful prep. This guide will show you how to make perfect homemade chimichangas. They’ll wow your family and friends.
Preparing the Chicken Filling
First, get your chicken filling ingredients ready. You’ll need:
- 3 cups shredded chicken
- 1 cup salsa
- 2 tablespoons taco seasoning
- 1/2 cup sour cream
Mix the chicken with salsa and taco seasoning in a bowl. Good baked chicken recipes start with a flavorful, moist filling.
Tortilla Selection and Handling
Choose large flour tortillas, about 8 inches. Warm them a bit to make them easier to fold. This helps avoid cracks when rolling.
Assembly Techniques
Here’s how to assemble perfect homemade chimichangas:
- Preheat your oven to 400°F
- Spread 16 ounces of refried beans on each tortilla
- Add 1/3 cup of chicken filling to the center
- Sprinkle 1/4 cup shredded cheddar cheese
- Fold the sides of the tortilla
- Roll tightly to seal the filling
Brush the rolled chimichangas with 1 tablespoon of cooking oil. Bake for 15-25 minutes until they’re golden brown.
Pro tip: For extra flavor, top your baked chicken chimichangas with red enchilada sauce and a dollop of sour cream!
Mastering the Filling Combination

Making the perfect shredded chicken filling is like an art. It’s all about the mix of ingredients that make your chimichangas taste amazing. The best filling has the right mix of protein, texture, and flavor.
When you make your shredded chicken filling, remember these important parts:
- Tender shredded chicken (preferably slow-cooked)
- Creamy refried beans
- Melted cheese blend
- Zesty green chile sauce
The secret to a great filling is in the seasoning and keeping it moist. Your chicken should be juicy but not make the tortilla soggy. A good filling should taste rich and match the crispy outside of your baked chimichanga.
| Ingredient | Quantity per Chimichanga | Nutritional Impact |
|---|---|---|
| Shredded Chicken | ½ cup | 39g Protein |
| Refried Beans | ¼ cup | 4g Dietary Fiber |
| Cheese | ½ cup | 14g Fat |
Want to try something new? Add roasted veggies, different proteins, unique cheeses, or spicy peppers to your filling.
Your aim is to make a filling that’s both filling and true to Tex-Mex. The right mix will turn your baked chicken chimichangas into a real treat.
Baked Chicken Chimichangas: The Perfect Technique
Making delicious oven-baked wraps needs precision and care. Your snacks will turn from simple ingredients into crispy, tasty treats with the right baking method.
Temperature Control for Crispy Perfection
Getting the oven temperature just right is key for your chicken chimichangas. Heat your oven to 450 degrees Fahrenheit for even heat. This high heat makes the outside crispy and the inside tender and flavorful.
- Preheat oven to exactly 450°F
- Use a reliable oven thermometer for accuracy
- Position rack in the middle of the oven
Timing and Doneness
Cooking time is important for the perfect chimichanga. Bake your wraps for 8 to 10 minutes, watching closely to avoid overcooking. Aim for a golden-brown outside and melted cheese inside.
- Bake for 8-10 minutes
- Check for golden-brown color
- Ensure cheese is fully melted
Achieving the Ultimate Crunch
To make your snacks crispy, brush the tortillas with ¼ cup of canola or vegetable oil before baking. This method gives a crunchy texture, just like fried chimichangas.
- Brush tortillas with oil before baking
- Use canola or vegetable oil
- Coat evenly for consistent crispiness
Pro tip: For an extra crispy texture, place chimichangas on a wire rack during baking. This lets hot air circulate fully around the wrap.
Creating the Perfect Cheese Blend
When making delicious baked chicken chimichangas, picking the right cheese is key. Monterey Jack cheese is the best choice for its creamy and mild taste. It melts perfectly, adding to the dish’s flavor and texture.
Your cheese blend can make the chimichanga even better. Here are some cheese combinations to try:
- Monterey Jack (primary cheese)
- Oaxaca cheese for authentic Mexican flavor
- Reduced-fat cheddar for added sharpness
| Cheese Type | Quantity | Flavor Profile |
|---|---|---|
| Monterey Jack | 1 cup | Mild, creamy melting cheese |
| Oaxaca | 1/2 cup | Stringy, rich Mexican cheese |
| Reduced-fat Cheddar | 1/2 cup | Sharp, tangy complement |
When making your chimichangas, make sure to distribute cheese evenly. This prevents leakage and makes sure every bite is full of flavor. Aim for a 4:1 cheese-to-chicken ratio. This lets the cheese enhance the dish without overpowering the chicken.
Essential Toppings and Garnishes
Adding the right toppings can make your mexican cuisine experience unforgettable. Your homemade chimichangas need a vibrant finish that pleases the eyes and taste buds.
Fresh Ingredients That Shine
Use these colorful toppings to elevate your dish:
- Crisp shredded lettuce
- Diced ripe tomatoes
- Chopped fresh cilantro
- Sliced black olives
- Diced red onions
Sauce Options to Elevate Flavor
Choose from these tasty sauces to enhance your dish:
- Pico de gallo for fresh zestiness
- Creamy guacamole
- Tangy sour cream
- Spicy salsa verde
- Smoky chipotle sauce
Presentation Tips for Stunning Plates
Make your homemade chimichangas look like they came from a restaurant. Arrange toppings in a colorful pattern. Drizzle sauces artfully and garnish with fresh herbs. A well-presented dish makes your meal Instagram-worthy.
Storage and Make-Ahead Tips

Preparing easy baked snacks like homemade chimichangas in advance can save you time. It makes meal planning a breeze. Whether you’re cooking for a busy family or planning ahead for a gathering, knowing how to store and prepare these delicious treats is essential.
Refrigeration is your best friend when it comes to preparing chimichangas ahead of time. You can assemble your chimichangas and store them in an airtight container for up to 24 hours before baking. This makes them perfect for quick weeknight meals or last-minute entertaining.
Freezing Techniques
Freezing homemade chimichangas is an excellent way to have easy baked snacks ready at a moment’s notice. Follow these storage tips:
- Wrap each chimichanga individually in plastic wrap
- Place wrapped chimichangas in a freezer-safe container
- Freeze for up to 2-3 months
Reheating Instructions
To maintain the crispy texture of your chimichangas, follow these reheating guidelines:
- For refrigerated chimichangas: Bake at 400°F for 10-15 minutes
- For frozen chimichangas: Thaw overnight in the refrigerator, then bake at 400°F for 15-20 minutes
- Ensure internal temperature reaches 165°F for food safety
Pro tip: Avoid microwaving, as this can make the tortilla soggy and compromise the crispy exterior that makes chimichangas so delightful.
Nutritional Information and Health Benefits
Healthy chimichangas are a tasty choice instead of fried ones. They are made with baked chicken, making them a great option for those watching their diet. Knowing what’s in them helps you make better food choices.
The nutritional facts of baked chicken chimichangas show they’re good for you:
- Calorie Content: Usually has 300-400 calories per serving
- Protein Power: Offers 20-25 grams per serving (40-50% of daily recommended intake)
- Fat Composition: Has 15-20 grams of fat per serving
- Carbohydrate Level: Gives 30-40 grams per serving
Your baked chicken chimichangas can be a balanced meal. The chicken’s protein is good for muscles, and the beans and veggies add fiber for digestion. Using whole wheat tortillas makes it even healthier.
People watching their fat intake will like baked chicken recipes. They have less fat than fried ones. Baking keeps the outside crispy and the inside tender without extra oil.
Key nutritional highlights include:
- Vitamin A: 10-15% of daily value
- Iron: 10-20% of daily value
- Fiber: 2-4 grams per serving
By choosing the right ingredients, you can make these healthy chimichangas even better. They’re good for you and taste great.
Serving Suggestions and Side Dishes
When you make baked chicken chimichangas, picking the right sides can make your meal unforgettable. The right sides will highlight the flavors of your chimichangas.
Traditional Mexican sides add real flavor and texture to your meal. Here are some classic choices:
- Mexican Rice – A fluffy, seasoned rice that soaks up the chimichanga flavors
- Refried Beans – Creamy and rich, they offer a smooth contrast
- Elote (Mexican Street Corn) – Grilled corn with tangy seasonings
Contemporary Culinary Companions
For a modern twist, try these side dish options:
- Roasted vegetable medley with bell peppers and zucchini
- Quinoa salad with lime and cilantro
- Fresh green salad with avocado vinaigrette
Beverage Pairings
Choose drinks that match your tex-mex dishes:
- Margaritas for adult gatherings
- Horchata for a traditional non-alcoholic choice
- Mexican sodas like Jarritos
Trying different sides makes your meal balanced and exciting. It celebrates the rich world of mexican cuisine.
Conclusion
Making homemade chimichangas turns a simple meal into a special treat. Choosing baked chicken chimichangas is a smart move for your health. It lets you pick what goes into your food, cutting down on calories and making a meal that rivals restaurant quality.
Starting your baked chicken chimichangas journey opens up a world of possibilities. Try new proteins, spices, and fillings to match your taste. With each dish, you’ll get better at cooking and love Mexican food even more.
Cooking is a joy that brings people together. Serving a healthy, tasty meal is rewarding. Whether it’s for family dinner or a party, homemade chimichangas impress everyone. Your cooking journey is exciting – savor every bite!
FAQ
Are baked chicken chimichangas healthier than fried ones?
Yes, baked chicken chimichangas are healthier. They use the oven instead of deep-frying. This cuts down on calories and fat but keeps them crispy.
Baking means you use less oil. It’s a better choice for those watching their diet.
Can I make chimichangas ahead of time?
Absolutely! You can make chimichangas ahead and store them in the fridge for 2-3 days. Or freeze them for up to 3 months.
Just bake them when you’re ready. This is great for busy families or meal preppers.
What type of tortillas work best for baked chicken chimichangas?
Large flour tortillas are best. Choose fresh, pliable ones that are big enough for your filling. Whole wheat tortillas are a healthier option, adding fiber.
How can I ensure my chimichangas turn out crispy when baking?
Brush them with a little oil before baking. Use a hot oven (around 400°F). Place them on a wire rack.
This helps them stay crispy. It prevents them from getting soggy.
Can I make vegetarian chimichangas using this recipe?
Definitely! Use plant-based proteins like black beans or refried beans instead of chicken. Add veggies like roasted peppers or spinach for a tasty vegetarian version.
What are the best cheese options for chicken chimichangas?
Monterey Jack is a top choice because it melts well and tastes mild. You can mix it with cheddar, pepper jack, or queso fresco for more flavor.
How long do baked chicken chimichangas take to prepare?
It takes about 45-60 minutes to prepare. This includes making the filling, assembling, and baking. Baking takes 20-25 minutes, depending on your oven and chimichanga size.
Are baked chicken chimichangas kid-friendly?
Yes! Chimichangas are great for kids. You can adjust the filling and spice level. They’re fun to eat and kids love the crispy outside.
Free Body Calculator – Know Your Body
Wondering if your body is in a healthy range? Use our Free Body Calculator to find out if you’re fit, normal, or need a lifestyle change. Get personalized tips, calorie targets, and your ideal protein, carbs, and fat intake – all in seconds.
Try Free Body Calculator Now
The Best Baked Chicken Chimichangas Recipe – Easy And Flavorful
Ingredients
- For the Filling:
- 2 cups cooked shredded chicken (rotisserie works great!)
- 1 teaspoon chili powder
- 1 teaspoon cumin
- ½ teaspoon garlic powder
- ½ teaspoon onion powder
- ½ teaspoon smoked paprika
- ½ teaspoon salt
- ¼ teaspoon black pepper
- ½ cup salsa your choice of mild, medium, or hot
- ½ cup refried beans optional, adds creaminess
- 1 cup shredded cheese cheddar, Monterey Jack, or Mexican blend
- 2 tablespoons chopped cilantro optional
- For the Chimichangas:
- 4 large burrito-size flour tortillas
- 2 tablespoons melted butter or olive oil for brushing
- For Serving:
- Sour cream
- Guacamole
- Salsa
- Chopped green onions
- Fresh lime wedges
Instructions
- Prepare the Filling:
- Preheat oven to 400°F (200°C). Line a baking sheet with parchment paper.
- In a large bowl, mix shredded chicken, chili powder, cumin, garlic powder, onion powder, smoked paprika, salt, black pepper, salsa, refried beans (if using), and shredded cheese. Stir until well combined.
- Assemble the Chimichangas:
- Warm tortillas slightly to make them pliable (microwave for 15-20 seconds).
- Spoon ¼ of the chicken mixture into the center of each tortilla.
- Fold in the sides, then roll up tightly like a burrito, tucking in the edges.
- Place seam-side down on the baking sheet and brush tops with melted butter or olive oil.
- Bake Until Crispy:
- Bake for 20-25 minutes, flipping once halfway, until golden brown and crispy.
- Serve And Enjoy:
- Serve hot with sour cream, guacamole, salsa, and fresh lime wedges.
Notes
- Make It Spicier: Add diced jalapeños or use spicy salsa.
- Air Fryer Option: Cook at 375°F (190°C) for 10-12 minutes, flipping halfway.
- Storage And Reheating: Store in the fridge for up to 3 days, reheat in the oven at 350°F for 10 minutes for crispiness.
- Freezer Friendly: Wrap in foil and freeze for up to 3 months. Reheat from frozen at 375°F for 20 minutes.